Custom sweat tutorial
Mon Jun 16, 2008 6:18 am
Inspired by the impressive alpha channel in faces by A_NuKe and Urh (urh28), I have managed to figure out a way to combine both.
If you have the following items:
Here I will use Manu Ginobili created by Jom (Modifly) and me, since he has a bald spot and needs some customized sweat.
And you're done the creating part - now to import it...
First "Flatten Image", then "Select Canvas", and copy this texture onto the "Alpha Channel" of the DDS that you've exported/made. Import it into the FSH with FshX, and of course, place the FSH into your "sgsm" folder.
I sincerely hope that you could make great use of this tutorial.
Enjoy and may miracles happen.
If you have the following items:
- my self-explanatory PSD file
- Pdub's sweat textures - the VERY FIRST item on the list
- some nice brains
Here I will use Manu Ginobili created by Jom (Modifly) and me, since he has a bald spot and needs some customized sweat.
- Obviously, you have to open the PSD file that you downloaded above, along with your, or someone else's "bhed" texture opened in Photoshop.
- REMINDER: If you have made a custom sweat for a CF made by someone else, you need his/her/their/its? permission before you can re-release it.
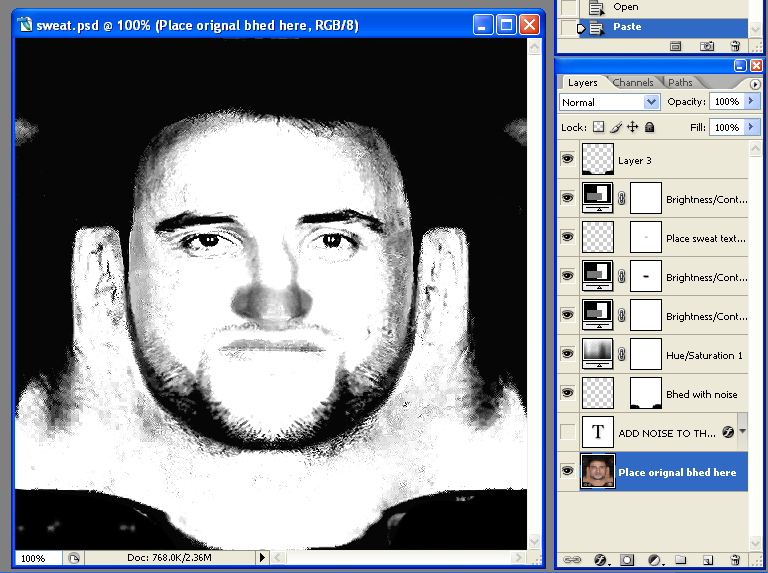
You should get something similar to the above pic after you have done step 1 correctly. - Now paste the "bhed" onto the layer "Bhed with noise" as well.
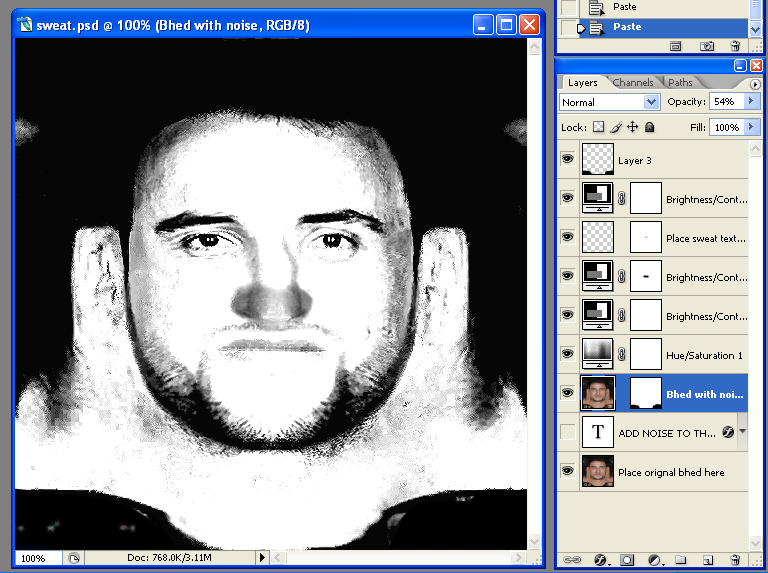
Notice that there are no visible changes after you have done step 2 - that is how it is supposed to be. - Add noise with the correct settings to the layer named "Bhed with noise".
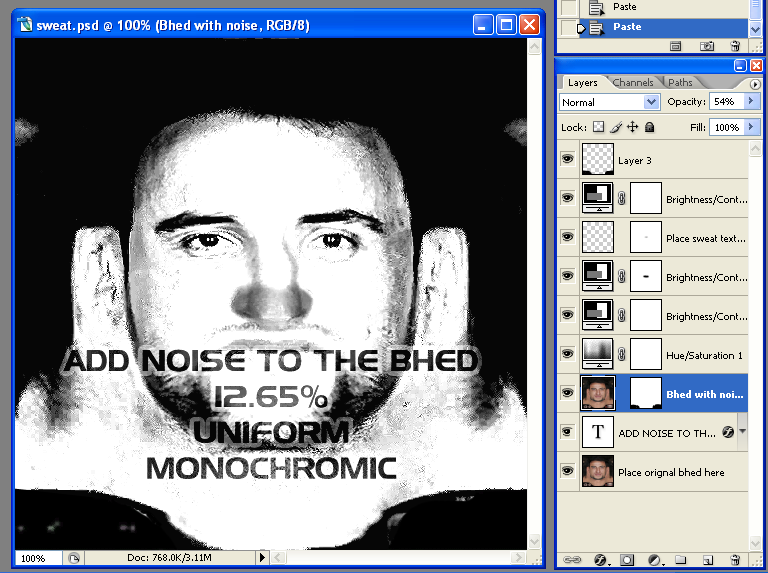
And you should get something like the following.
- Finally, open Pdub's sweat texture. Hairline is no longer a problem now, so I chooses "Bald2.bmp".
Copy and paste it onto the layer "Place sweat texture here".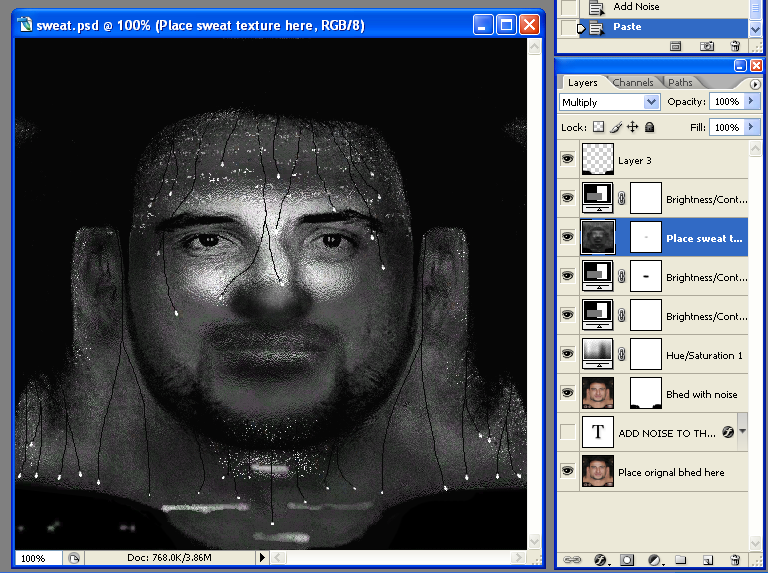
In some occasions, the outcome may not look as good, mostly likely due to the fact that the player that you are updating has a darker/lighter skin tone. In that case, try adjusting one or more of the "Adjustment Layers" until you are satisfied.
And you're done the creating part - now to import it...
First "Flatten Image", then "Select Canvas", and copy this texture onto the "Alpha Channel" of the DDS that you've exported/made. Import it into the FSH with FshX, and of course, place the FSH into your "sgsm" folder.
I sincerely hope that you could make great use of this tutorial.
Enjoy and may miracles happen.
Last edited by CKal on Mon Jun 16, 2008 7:37 am, edited 2 times in total.
Mon Jun 16, 2008 7:26 am
wwwooooowwww,,,  amazing man . Very thanks for this, i asked a few day for it. i have to say one more time : Really thanks

Mon Jun 16, 2008 3:12 pm
Useful tutorial Kal 
You have brought the art of Alpha layer to another level. Congratulation for your achievement and invention
I'm proud as I'm one of the first to see this sweat layer - that was when we were making Kobe
This should be stickied
You have brought the art of Alpha layer to another level. Congratulation for your achievement and invention
I'm proud as I'm one of the first to see this sweat layer - that was when we were making Kobe
This should be stickied
Tue Jun 17, 2008 5:51 am
Thanks for the comments.  But I am surprise that such a small amount of people find this useful...
Tue Jun 17, 2008 12:21 pm
Sticky this Andrew bro cuz this is nice for some patchers bro.
Tue Jun 17, 2008 2:07 pm
Sticky! Sticky! Sticky! Sticky!
Tue Jun 17, 2008 6:43 pm
Please don't pester us to sticky threads. If it's worthy of being stickied, we will get around to it.
Tue Jun 17, 2008 7:10 pm
Sorry Andrew, I got a little bit too overexcited 
Tue Jun 17, 2008 7:27 pm
No harm done. 
Tue Jun 24, 2008 1:53 am
First "Flatten Image", then "Select Canvas", and copy this texture onto the "Alpha Channel" of the DDS that you've exported/made. Import it into the FSH with FshX, and of course, place the FSH into your "sgsm" folder.
I sincerely hope that you could make great use of this tutorial.
CKal, Can you explain more about this part? I don't understand this part.
I sincerely hope that you could make great use of this tutorial.
CKal, Can you explain more about this part? I don't understand this part.
Tue Jun 24, 2008 1:58 am
CKal how can I copy the flatten image into the alpha channel?
Tue Jun 24, 2008 5:15 am
First off, you should at least have some face making experience before trying the "custom sweat".
You add them like normal sweat. You can look at OG's tutorial.
Also basic Photoshop skill is needed.
And of course, some brains (I'm not saying that you don't have them).
OK. Go back to the original bhed, and in the small "window" at the bottom right corner of Photoshop, there are 3 tabs. One is "Layers". The other is "Channels".
Go to the "Channels" tab (by clicking on it, duh). Select the channel "Alpha 1". If it is not there, go to the bottom of the tab and click the button which will create a new channel.
Then paste the flattened custom sweat texture there.
And also, try using the "Edit Post" function instead of double-posting.
You add them like normal sweat. You can look at OG's tutorial.
Also basic Photoshop skill is needed.
And of course, some brains (I'm not saying that you don't have them
OK. Go back to the original bhed, and in the small "window" at the bottom right corner of Photoshop, there are 3 tabs. One is "Layers". The other is "Channels".
Go to the "Channels" tab (by clicking on it, duh). Select the channel "Alpha 1". If it is not there, go to the bottom of the tab and click the button which will create a new channel.
Then paste the flattened custom sweat texture there.
And also, try using the "Edit Post" function instead of double-posting.
Re: Custom sweat tutorial
Sun Dec 21, 2008 10:25 pm
Im kinda new to this process, but. What exactly is an "Alpha Channel"??
Re: Custom sweat tutorial
Sun Dec 21, 2008 10:45 pm
How can i save my file as a .DDS file?
Re: Custom sweat tutorial
Tue Dec 23, 2008 9:44 pm
mynameisgerd, you must first download the .dds plugin at the nVidia website. Alpha channels are used to avoid "shiny heads" on cyberfaces.